
How many times have you taken a photo on a sunny day, only for the subject to be in deep shadow, and the background or sky to be burnt out? Our eyes have the ability to cope with these huge ranges of brightness, and ‘adjust’ accordingly, but sadly even the best cameras are limited in how much they can handle. Expose for the shadows, and the sky will be burnt out – expose for the sky, and the subject will be too dark… If you are adept with Lightroom or Photoshop you can ’tweak’ the various bits of your image, but the effect is limited and often not sufficient to fix an image.
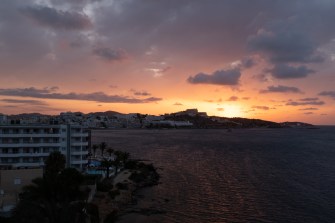
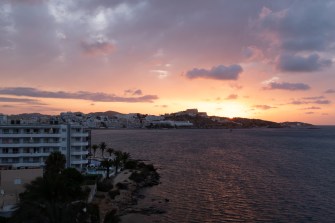
These three photos illustrate the problem – the foreground in the top photo is too dark; the sky in the bottom photo is too light; the middle shot has the best brightness range, but the sky is still a bit light and the foreground clearly too dark and the image lacks ‘punch’.
Graduated filters that fit on the front of your camera lens and just darken one area of the image are one way to control the brightness of the sky. However, filters are expensive, it’s all a bit of a faff to get them lines up, and don’t work very well if you don’t have a clear and straightish line between dark and light parts of your image. If a building is sticking up into the part of the sky you are trying to darken with the filter, then the building too will be darkened and won’t come out well.
Enter the magic of HDR (or High Dynamic Range). The trick is to take several shots, varying the exposure so you record detail in the lightest and darkest areas of the image, and then combine them so all parts of the photo are properly exposed and all the detail in the image is visible. Most modern cameras and smartphones have an HDR facility built-in, so it’s all done automatically for you, but the results aren’t always that good, and you generally don’t have any control over the process.
 It’s easy enough to do with your camera though, and potentially gives much better results… Start by setting your camera to ‘exposure bracketing mode’ and set the number of exposures and the difference between them. The X100F is limited to just 3 shots, within a range of + or – 1/3rd to 2 stops, whereas my other camera (a Sony A7iii) can take up to 11 shots, not that you really need that many… Then take your 3 photos, keeping the camera as steady as possible – the merge process can compensate for small movements between shots anyway, but keeping the camera still helps. It’s also always worth shooting RAW rather than JPG images as there will be more scope for later adjustments. If you look across the set of three (or more) images you have taken you should be able to see detail in the lightest and darkest areas. If not, then try again, altering the overall exposure compensation up or down a bit.
 (If you really feel you need more than 3 shots with the X100F, there is a workaround – set the camera as above and take your first three shots, then turn the compensation dial to say, -3 and shoot again, then repeat using +3 – that way you end up with a series of 9 shots covering a wider exposure range. Keep the camera still during this whole process, so it really does mean using a tripod… Then choose maybe 5 or 7 shots that cover the range of exposures from darkest to lightest. Remember that with the X100F you can change exposure compensation by up to +5 and -5 by using the front wheel.)
 Then import your photos for editing (I always use Lightroom, but there is other software that will do HDR merging). Then select your set of images and right click, select Photo Merge, than HDR. It’ll take a few seconds to create a preview depending on how fast your computer is, and how many photos you are merging. Adjust the options for auto aligning images and adjusting deghosting if necessary and then click ‘merge’ and Lightroom will, in a few seconds, add the new merged image to your filmstrip.

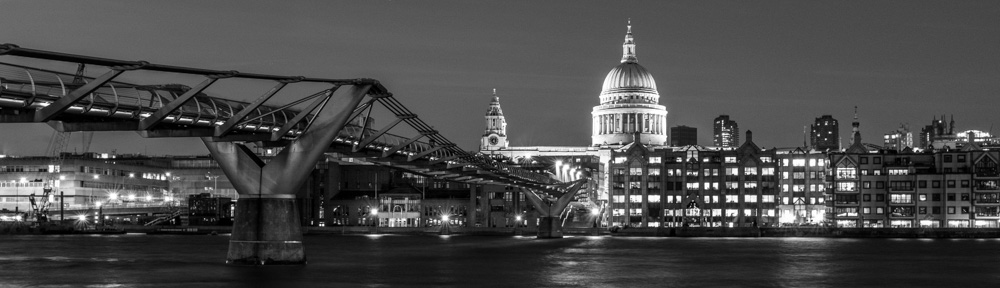
Finished HDR image
The resulting image should capture the widest possible range of tones, and you can make any further minor adjustments in the usual way.
It’s a great way to deal with subjects that would otherwise not turn out well because of the brightness range. It works well on bright sunny days when shadows are really pronounced, and also night time shots, although here of course you’ll definitely need a tripod.
Give it a try – it’s easier than it sounds!
 Using
Using  Start point is to get a 49mm R72 infrared filter (you’ll need the filter adapter for the X100 if you don’t already have it.) I used the
  It’s a good idea to adjust the white balance on the camera too, and rather than use a white card, just point the camera at a patch of grass or similar when setting it (p67 in the